Collections
Seeking
Selection of materials is of the utmost importance in the process of qin making. The material has to be particularly “light, porous, crisp and smooth”. Naturally air-dried old Chinese fir, Chinese parasol and Chinese catalpa, that have been stored for years are the best materials for making a qin. On top of possessing good sound qualities, naturally air-dried wood seldom cracks. The top board of the qin is usually made of Chinese fir or Chinese parasol; the bottom board is usually made of Chinese catalpa or other hardwood. The wood for making the qin should have smooth grain lines and even width. There should be no knots or moth damage to the wood.
Chopping
Qins come in a myriad of styles. In the second step of the qin making process, the design of the qin is drawn onto the wood. The process usually begins with a proposed scheme of measurements for each part, from which paper patterns are drawn. These patterns are next copied onto the wood. To condition and scoop the top and bottom boards into a qin body, the maker must first saw out the qin shape. An axe is next used to chop out the basic shape of the qin, followed by the long plane, which is used to trim and condition the qin top. Using the curve measure as a guide for precision, the qin’s top board is planed to a standard curvature. The short plane and the spokeshave are next used for detailed shaping. The qin bottom must be straight along the middle axis. A small curve should be trimmed across the sides.
Hollowing
Inside the top board is the cavity belly, which forms the qin’s resonance box when assembled with the bottom board at the base. The cavity belly needs to be thick in the head and thin in the tail, with a slightly thicker middle axis. The sides should appear curved at the edges, and these should be thinner than the middle. The cavity belly requires different chisels to hollow it out. It is next smoothened with a round plane and a flat plane for conditioning, so that the cavity belly can become rounded and smooth while maintaining the parts of the sound absorbers (nayin) and the feet pools (zhuchi). The thickness and the curvature of the cavity belly affect the qin’s resonance and timbre. When refining and hollowing out the cavity belly, the bottom board has to be fitted over the cavity belly from time to time so that the maker can knock at different parts of the qin body to check the sound’s firmness. The inner side of the bottom board also requires refining to improve its curvature.
Fitting
A hollowed and conditioned qin body next has hardwood accessories installed, such as the Mount Yue (yueshan), peg shields (huzhen), dragon gum (longyin), goose feet (yanzu), etc. The adhesive is usually a mixture of raw lacquer and flour. One variation makes use of melted animal gum, such as pig skin gelatine. The Mount Yue, i.e. the bridge, is installed horizontally onto the qin head to support the strings while the dragon gum is a piece of wood placed in the middle of the tail to support the strings. Accessories on the tail, such as the ceremonial caps (guanjiao), are made of hardwood. They can protect the tail and are also used as decoration. Red sandalwood, mahogany, rosewood and ebony are considered premium hardwoods. The 13 markers (hui), which are usually made of mother-of-pearl, are inlaid on the surface of the qin. Among them, the seventh marker in the middle is slightly larger than the others. The other markers on each side are successively smaller than the previous one. Each marker is fitted at the harmonic point of the qin string. Each marker’s position has to be calculated according to the length of the qin string and are usually installed after the qin has been primed with lacquer cement.
Assembling
The chopped and hollowed top board and bottom board can be held together with a mixture of raw lacquer and flour, or with animal gum. After the boards have adhered to each other, a linen cloth can be glued onto and wrapped around the qin body, using an evenly applied layer of a mixture of raw lacquer and flour. This helps tightening the qin body and prevents the lacquer on the qin top from warping and cracking. Another way of assembly is to use bamboo nails to hold the top and bottom boards together at the corners of the forehead, the shoulders, the wings, the waist and the tail. The bamboo nails are inserted from the bottom upward. No adhesive is involved with this method.
Cement Priming
After completing the wood base, a horn spatula is used for priming the lacquer cement, which is made by mixing raw lacquer and antler powder. Antler powder is ground from broiled antler and categorised into the following grade classes: 800, 1200, 2000, etc. The greater the number is, the finer the powder. Multiple layers of lacquer cement have to be applied onto the qin base, beginning with the coarsest one. After the base cement has dried, it can be sanded smooth. The process is repeated a few times, using finer cement on each successive layer of application. After the lacquer cement has completely dried, it forms the base cement, which has a hard texture designed to protect the wood. An appropriate thickness of base cement can also improve the instrument’s timbre. The dried base cement has a natural chestnut brown hue which becomes black when mixed with carbon black, or sharp red or brownish red when mixed with cinnabar. Scraps of gemstones and coral, called the babaohui (eight-jewel powder), can also be added to create special visual effects.
Sanding
The sanding is to be completed with abrasive paper of different grit sizes, chosen according to the class number of the antler powder applied. Both dry and wet sanding have to be performed. For the coarse and thin bottom layer of base cement, use rough abrasive paper or coarse stones for sanding. The successive medium-fine cement layers are to be sanded with wet abrasive paper of a comparable fineness. The upper most fine base cement layer should be sanded with a finer waterproof abrasive paper. The process is to be completed until the top board of the qin is evenly flattened and smoothened.
Lacquering
A qin body with an already sanded cement base can be coated with lacquer. Surface lacquer strengthens the base cement and is beneficial for timbre and appearance. The lacquer has to be applied thinly and evenly. After a layer is dried, the highest-grit waterproof abrasive paper is used to polish the qin until the lacquer has been smoothened. Another layer of lacquer is applied onto the qin body until it glows with an even shine. The last step in lacquering is known as shine removal. It is done by coating the qin with a few layers of cooked lacquer and then polishing it with fine powder instead of abrasive paper to reveal the natural lustre. Raw lacquer dries easily in warm and humid weather. For this reason, lacquering and cement priming is usually carried out in either the spring or summer. After lacquering is complete, a steel knife can be used to carve the qin’s name and other inscriptions on the back of the instrument.
Stringing
After the lacquered surface has been polished, a tone tester is used to perform an acoustic test of the qin’s sound. If there is buzzing noise, it means the top board of the qin requires further conditioning or another round of cement priming and lacquering. When the lacquering process is complete, the instrument can be stringed and tuned. To mount strings onto the qin, use the tuning tassels (rongkou), which connect with the tuning pegs at the qin bottom, to hook the butterfly bow (yingtou) of the string at the bridge. Tie the other end of each string, around the dragon gum, to the goose feet. Next, turn the pegs to tune. The first group of thicker strings – the first to the fourth – are fastened onto the right goose foot, while the second group of thinner strings – the fifth to the seventh – are tied to the left goose foot. The thicker strings should be mounted first, followed by the thinner ones. New silk strings have to be mounted a few times before they are stabilised.
Photos
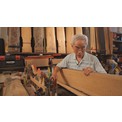
The first step of qin making process: seeking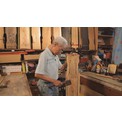
The second step of qin making process: chopping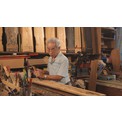
The third step of qin making process: hollowing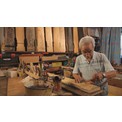
The fourth step of qin making process: fitting
Recommended Collection


Recommended Exhibition